High-Quality Video Playback on Linux
Some programs are so damn good that you start to see them without any relation to the platform on which they run. In this case, you start looking for their substitutes if you are unable to use them on some platforms, often without success. In my opinion, one of the better combinations for video playback is Media Player Classic Home Cinema in combination with MadVR video renderer. It is rather hard to beat this combination, but there is a very good, open-source alternative available on Linux: mpv+SMPlayer. In this post, I am going to describe how I essentially repeated my configuration for high-quality video playback on Linux.
I believe that there is one thing worth noting: as both SMPlayer and mpv are available on Windows the information from this post might be useful if you plan to use these programs on Windows as well. I think that no additional adaptation required for this platform. The same goes for macOS.
I would suggest you keep the man page of mpv opened so that you can quickly read about the configuration options referenced in this post.
Important Options for High-Quality Video Playback
To improve video playback quality, we need the following:
- Good scaling algorithms - I believe that this part is obvious. I should note that scaling algorithms are computationally intensive in general and require a fairly high-performance video card. I suggest that you use the following algorithms: ewa_lanczos (aka jinc) with an anti-ringing filter for up-scaling and chroma scaling, mitchell for down-scaling. A better alternative to ewa_lanczos would be ewa_lanczossharp, but it is very computationally intensive. If you have decided to use it, I believe that you might not need the anti-ringing filter in that case.
- Smooth-motion (with V-Sync). Here I should note that this is not converting video to the higher frame-rate as some might think. This technique allows frames from a video to better synchronise with frame-rate of your display. Without this, some judder might appear during motion. This technique is called Interpolation in
mpv'smanual, and there is an in-depth explanation of it on the wiki of the project. - Debanding filter - prevents colour banding from appearing on the scenes containing some gradients.
Configuring mpv
Let's create a configuration file for mpv which uses the techniques mentioned above. The configuration file of mpv is located here: ~/.config/mpv/mpv.conf, we are going to add the options described below into it.
In some cases, I am going to mention settings both for middle-end and high-end systems. In my opinion, the visual difference between them is so subtle that I would suggest that you go with the configuration for middle-end systems first, especially if you use a laptop. If you use a relatively modern desktop or do not mind extra battery drain and fan noise then go experiment with the configuration for high-end systems.
The first thing which we should set is a video renderer profile. There are many of them but gpu and gpu-hq are the ones in which we are interested the most. These, as you might have guessed, allow offloading most of the video post-processing and rendering to a GPU using OpenGL or Vulkan API. gpu-hq is pre-configured to use higher quality, more computationally intensive filters.
middle-end systems:
profile=gpu
high-end systems:
profile=gpu-hq
We may use Vulkan or OpenGL as a GPU API. Honestly, I have not noticed any difference in performance when playing a video using either, so I would suggest that you stick with OpenGL as the most compatible option. We are going to enable V-Sync as well.
gpu-api=opengl
opengl-swapinterval=1
If you want to use Vulkan instead, here is how to do it:
gpu-api=vulkan
vulkan-swap-mode=fifo
The next logical step is to configure smooth-motion. Here is how:
video-sync=display-resample
interpolation
tscale=oversample
Now let's configure scaling.
middle-end systems:
scale=ewa_lanczos:scale-antiring=1
cscale=ewa_lanczos:scale-antiring=1
dscale=mitchell
correct-downscaling
high-end systems:
scale=ewa_lanczossharp
cscale=ewa_lanczossharp
dscale=mitchell
correct-downscaling
It is a good idea to enable dithering when it is necessary. mpv uses a fairly good dithering algorithm by default.
dither-depth=auto
The last step is to offload video decoding to GPU when possible. It is especially useful for laptops. We are using auto-copy instead of auto to enforce copying back decoding results back to the system RAM. It might be necessary for some filters to work and helps to avoid some decoding issues at the expense of a relatively small performance loss.
hwdec=auto-copy
Using SMPlayer with a Pre-configured mpv Instance
I prefer to use mpv as a back-end of SMPlayer. If you are going to use mpv as a standalone video player then you can skip reading this section.
Modern versions of SMPlayer can use mpv as its back-end without any additional configuration. However, SMPlayer tries to have mpv under its full control and starts it with --no-config option. It forces mpv to ignore its default configuration file. Fortunately, SMPlayer can pass user-defined command-line options to mpv, which allows us to bypass this limitation. To do it we have to use this extra option to force mpv to load its configuration file:
--include=~/.config/mpv/mpv.conf
Here is the screenshot which shows us how to do it:
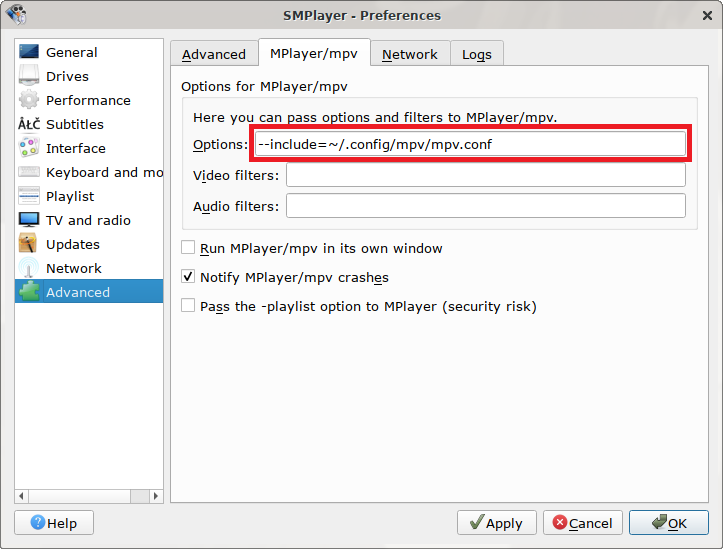
Please keep in mind that SMPlayer expects that mpv does not load its configuration file, so be conscious about what you have in the mpv.conf file.
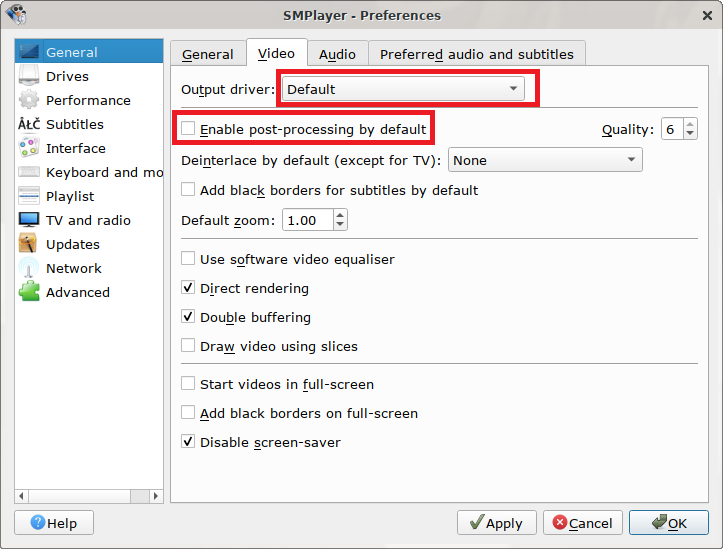
Also, it might be a good idea to configure SMPlayer to use Default video output engine with disabled post-processing:
Conclusions
In this post, we have configured mpv and SMPlayer for high-quality video playback. I think that there are some things left which are worth noting.
Firstly, the video output quality depends mostly on the quality of the video files. No amount of configuration will make a miracle here if all you have is a low-quality media material.
Secondly, the quality of the display matters a lot. It does not necessarily mean that you should use these ridiculously expensive professional displays for high precision colour work. Adequately priced display with good IPS matrix will do. I doubt that you will see any difference on a low-end TFT monitor.
I think that these things are rather obvious, but I wanted to have them mentioned anyway.
Hopefully, this post will improve your anime video playback experience and make your entertainment more joyful.
Categories: UNIX/Linux Tips